Adam if you happen too ever read this, thank you for all works and sharing what you have learned with the world.
Wednesday, August 21, 2013
Adam Savage
Adam if you happen too ever read this, thank you for all works and sharing what you have learned with the world.

Sunday, August 18, 2013
speed build power cord spinner
Once in a while I need something to solve a issue but don't have a lot of interest in building it. This is one of those cases. I needed something to keep my power cord in order but didn't care a lot about how it looked. I took a few minutes during a file transfer and drew up a plan. From there I didn't really measure I just took a pile of scrap wood and started building. It's not pretty but it was free and works.
This is the final product with the cord wound up.

On the right you can see the handle which spins the center. The piece sticking out on the bottom is for my foot to hold it up. I might add some feet now that I know it works. The small section of cord on the right is the plug that goes into the wall. I used zip ties to secure it to the piece which you can see better here:

I gave my self about ten feet of cord to get to the wall. Then I just spun the handle and wound the cord up in the center. I did use two pieces to make the center wider. I didn't want the cord being wound too tight and damaging it.
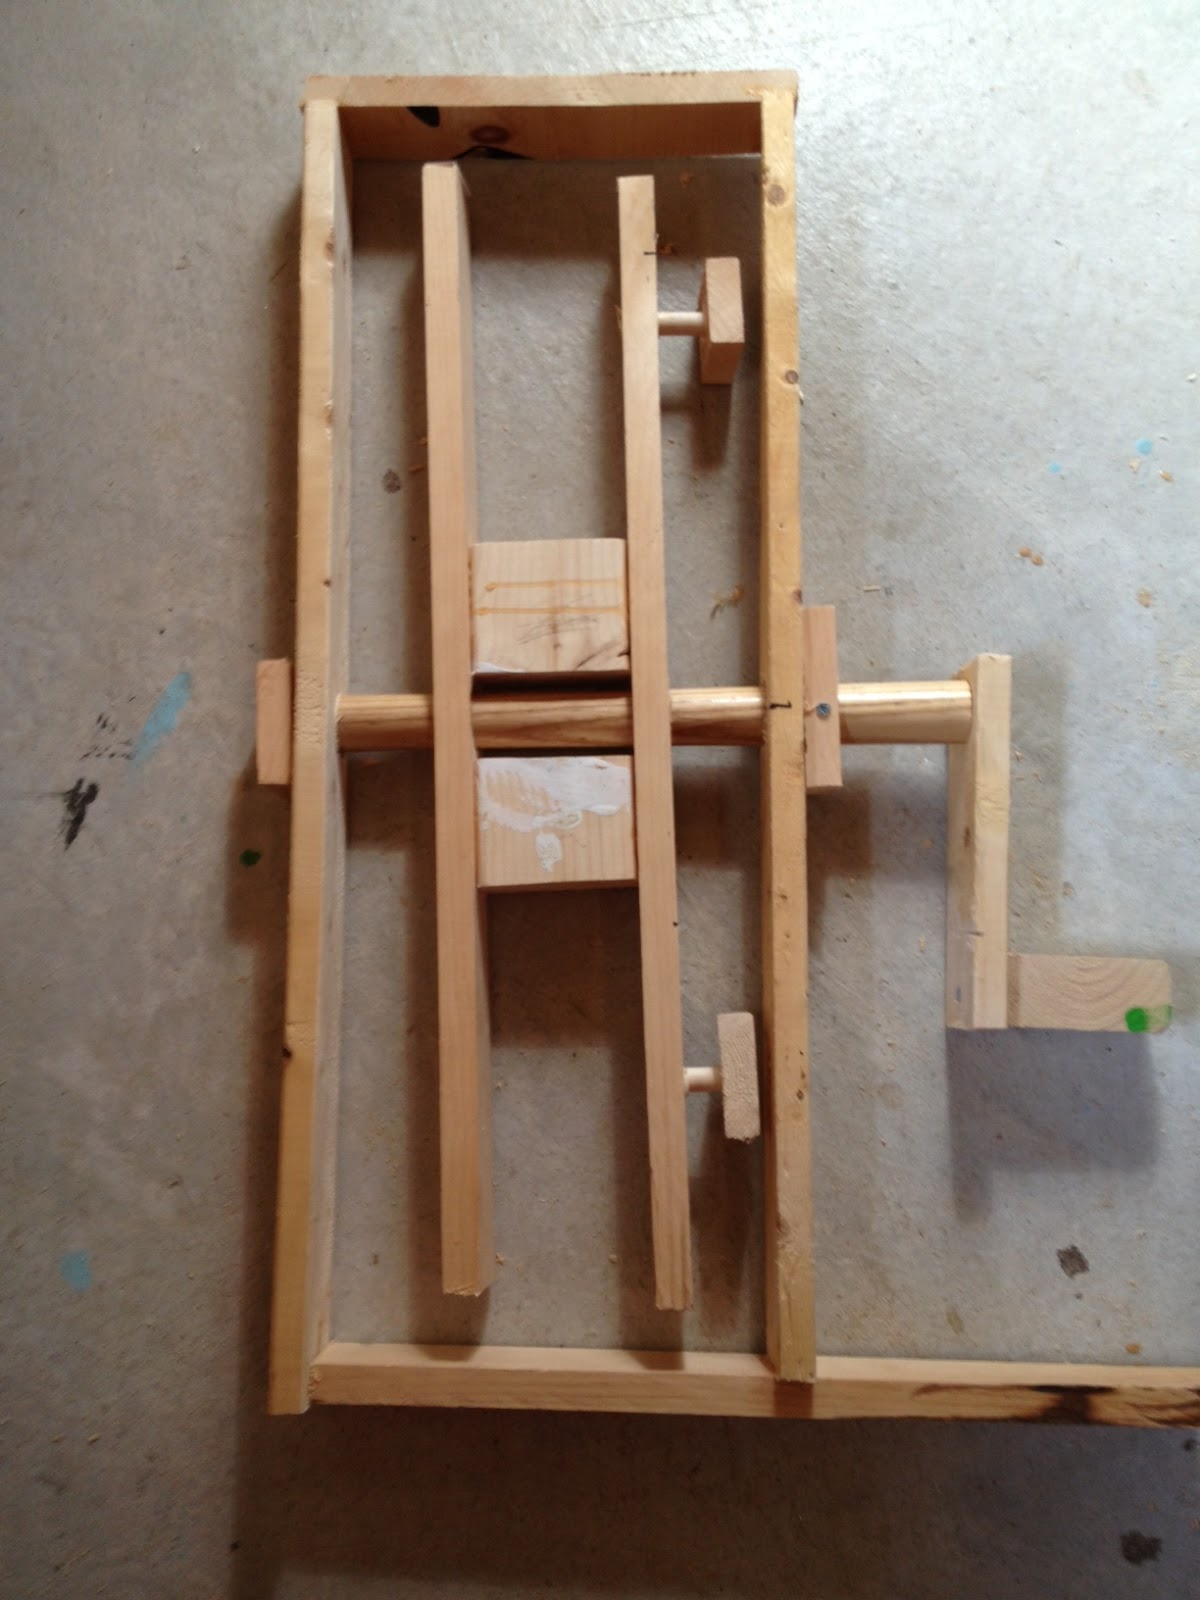
Now that you get an idea how it works here is it without the cord.

It's not perfect but like I said it was a speed build that I just wanted done. I built it out of mostly 1" thick pieces. The center shaft is a old broken shovel. The shovel was tapered so it caused the center be off a little. If you used a real dowel it would probably look better. I had a old dowel around so the side pieces to hold the 10' of cord for the wall are made with the dowel and a 1" square. I used a hole saw to drill through the pieces for the dowel. I used glue and small screws I had around to hold it all together.
One feature that I did think about while I built it, was I wanted to be as flat as possible. If you look at the picture above the entire unit lays flat. Mostly I just had to make sure to put the handle on right.
Just thought I would post a few pictures, maybe it will interest someone. At least it shows that I was in my shop :)
You can get things like this that look nice at a hardware store. The issue I had with them was mostly cost. I didn't really want so spend anything and I already had a nice cord. Also the units at the store tend to shorter or thinner gauge then what I wanted and had.
This is the final product with the cord wound up.

On the right you can see the handle which spins the center. The piece sticking out on the bottom is for my foot to hold it up. I might add some feet now that I know it works. The small section of cord on the right is the plug that goes into the wall. I used zip ties to secure it to the piece which you can see better here:
I gave my self about ten feet of cord to get to the wall. Then I just spun the handle and wound the cord up in the center. I did use two pieces to make the center wider. I didn't want the cord being wound too tight and damaging it.
Now that you get an idea how it works here is it without the cord.

It's not perfect but like I said it was a speed build that I just wanted done. I built it out of mostly 1" thick pieces. The center shaft is a old broken shovel. The shovel was tapered so it caused the center be off a little. If you used a real dowel it would probably look better. I had a old dowel around so the side pieces to hold the 10' of cord for the wall are made with the dowel and a 1" square. I used a hole saw to drill through the pieces for the dowel. I used glue and small screws I had around to hold it all together.
One feature that I did think about while I built it, was I wanted to be as flat as possible. If you look at the picture above the entire unit lays flat. Mostly I just had to make sure to put the handle on right.
Just thought I would post a few pictures, maybe it will interest someone. At least it shows that I was in my shop :)
You can get things like this that look nice at a hardware store. The issue I had with them was mostly cost. I didn't really want so spend anything and I already had a nice cord. Also the units at the store tend to shorter or thinner gauge then what I wanted and had.
Friday, July 12, 2013
washer and dryer pedistals
So bending over to switch the laundry was getting old so I wanted to build some pedestals. To buy them you're looking at spending $130 each. I built mine for about $100 with plenty of scrap for another project or two. It's large enough to hold the dryer and washer. I also made the space between decking a few extra inches to fit our laundry baskets underneath.
I looked around and found these plans:
http://ana-white.com/2011/01/sausha%E2%80%99s-washerdryer-pedestals
I love Ana White's site, the projects are things that I would have in my house and in my skill range. A lot of projects out there are way too hard for me at this point or look like something from the 70's.
So I'm not going to post plans since you can go to Ana's site and get great plans there. There are only two modification I made.
1) I used two 2X4's instead of 4X4 for the legs, which she says you can do. She has a metal bracket in the plans but I just cut one 2X4 3.5" longer. Then I cut the outside corner off. If you look at step three and just picture the metal bracket replaced with wood you will get the idea. If you want picture just post a comment.
2) I used straight rectangle molding on the sides. This hid the seams including my decking cut which was a little off. Now I went to Home depot and it's $0.88 a foot which seemed like a lot. So I went over to lumber and bought another 2X4. I cut the 1/4" strips off to use as molding which looked great. The first strip I tossed into my scrap pile since it has a rounded edge. I'll find something to use it for.
Here it is with primer on it

I got it in place last night. Few things to keep in mind if you do this project. Make sure it does not block the plug. Mine is right at the height of the plug but I lucked out that I had enough room to pull it forward so I can plug in my dryer. This made the washer and dryer very high which is what we wanted but I was still surprised when I saw it in real life. Make sure you really think about the total height before you build it. I was also surprised how heavy the washer was, so get as many people to help as you can.
Thursday, May 30, 2013
ubuntu packages
I like to keep notes on the package management commands. I don't use it all the time so it's nice to have it on hand. All these except the dpkg command need to be run as root. Suggested method is using sudo <command>
See all packages on your system: dpkg --get-selections
Install a package: apt-get install <package name>
Update your package list: apt-get update
Upgrade to the latest packages: apt-get upgrade
Upgrade to the latest extended support version: apt-get dist-upgrade
Upgrade to the cutting edge at your own risk: do-release-upgrade
I like to run with the latest when I'm running a vm since I can rebuild it easily. For my "I just need it to work" machines I run the extended support version.
Service and killing X
Spent the last few days playing with my ubuntu virtual machine. Not sure what happened but I believe something in the upgrade to the latest version went wrong. Had a lot off issues with lightdm. Ended up just trashing it but learned a few things along the way.
Manage services useing the service command
get service status
service --status-all
service sends the status-all output to stderr. If you want to search for a service name you can run this: service --status-all |& grep <pattern>
service restart
service <service name> restart
example: sudo service lightdm restart
If X hangs you can run a few things to kill it
Alt + PrtScn +K
or
Ctrl + Alt + F1
(if you want more then one terminal you can hit F2 and F3)
Boinc client
I'm a big fan of the boinc project. I like that I can help with research projects of all kinds.
Web site: http://boinc.berkeley.edu/
I'm currently using the Ubuntu client and it's running nicely. I run it in a virtual machine to keep my data separate and so I can completely turn it off when I need too.
After issues with my machine I had to transfer the data. The two areas I had to transfer to keep all my settings and the units I was working was:
settings: /etc/boinc-client
project data: /var/lib/boinc-client
I used scp to copy the data between the two systems. I stopped the client and copied over the data. I tend to su to root to work. Some people like to use sudo on each command but after years of working on unix machines I just go to root. Not saying this is right it's just what I do.
sudo su -
service boinc-client stop
cd /etc
mv boinc-client boinc-client-old
scp -rp <old machine>:/etc/boinc-client .
cd /var/lib
mv boinc-client boinc-client-old
scp -rp <old machine>:/var/lib/boinc-client .
chmod -R boinc:boinc /var/lib/boinc-client /etc/boinc-client
Currently helping with the projects:
FreeHal https://www.freehal.net/
Climate Prediction climateprediction.net (needs lots of disk space)
Docking http://docking.cis.udel.edu
Rosseta http://boinc.bakerlab.org/rosetta
Saturday, May 11, 2013
development man pages
To install the man pages for development on Ubuntu
apt-get install manpages-dev
apt-get install manpages-dev
Subscribe to:
Posts (Atom)